


Get the job done with a pro
From training to full-service marketing, our community of partners can help you make things happen.
About the Audience Dashboard
Your audience dashboard highlights valuable details about your contacts. But it isn’t just about gaining insight: All the information on the audience dashboard is clickable, so you can instantly launch campaigns for specific sets of contacts.
In this article, you’ll learn about the data available in each section of the audience dashboard and how to take action on it.
Things to know
Here are some things you should know before you read about the audience dashboard in depth.
- Email marketing engagement and top locations apply to subscribed contacts only.
- The recent growth section looks at the last 30 days of account activity. All other data on the audience dashboard is cumulative over the life of your account.
Recent growth
The Recent growth section gives you an at-a-glance overview of your audience growth over the last 30 days. It also shows you which of your contact collection methods have helped you grow your audience the most.
You’ll see how many total new contacts you’ve added to your audience, as well as a breakdown of that number into subscribed and non-subscribed contacts. Click New Contacts, Subscribed, or Non-Subscribed to view each segment of your contacts.

We’ll also show you where your contacts came from. For example, let’s say you use a few tools to collect contacts: a Facebook signup form, a Mailchimp-hosted signup form, and our mobile app. This section will show you which percentage of your new contacts came from each of those sources. Click a signup source to target eligible contacts with an email, ad, or postcard.

Tags
The Tags section shows a list of the five most commonly used tags, along with the number of contacts for each. This highlights how you’ve organized your audience, so you can quickly identify trends based on your custom categories.
Click a tag to target eligible contacts with an email, ad, or postcard. To see all of the tags in your audience, click View all tags.

To learn more about how to organize your audience with tags, check out Getting Started with Tags.
Customer lifetime value and purchase likelihood
Eligible paid users with enough data from their connected store will get a high-level estimate of their contacts' Customer lifetime value and Likelihood to purchase again on the audience dashboard. For these features, we use the purchase behavior of your customers to train a predictive model specific to your store. We then categorize their customer lifetime value and likelihood to purchase again as low, moderate, or high.
Click any category to target eligible contacts with an email, ad, or postcard.

Predicted demographics
The Predicted demographics section shows the predicted gender and age range of your contacts. This data science feature is available for users with Mailchimp Standard or higher and Mailchimp Pro, and is based on shared Mailchimp account information from around the world.
Click any demographic category to create a targeted email, ad, or postcard for those contacts.

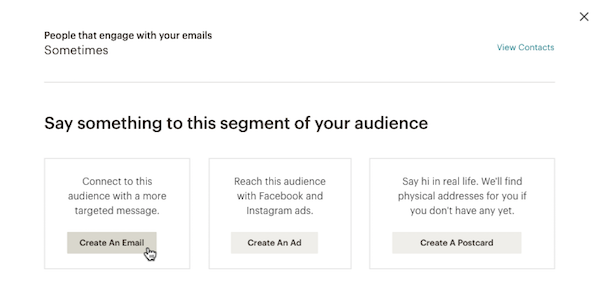
Email marketing engagement
The Email marketing engagement section shows three segments of your audience based on how they interact with your email campaigns: often, sometimes, or rarely. To stay up to date, we recalculate engagement levels as you send emails.
Click on any engagement level to target those contacts with an email, ad, or postcard.

Our email marketing engagement segmentation criteria also includes a level for brand new subscribed contacts, which isn’t surfaced on the audience dashboard. You can learn more about the different levels of email marketing engagement here.
Top locations
In the Top locations section, we’ll rank the cities where we detect the most activity from your subscribed contacts. To do this, we use geolocation data to estimate a contact’s physical location based on IP address. We collect this information when people subscribe to your emails from your Mailchimp-hosted signup form or landing page, or engage with your email campaigns. Subscribed contacts added to your audience through an import won’t be factored in until they’ve engaged with your email campaigns.
Click on a top location to target those contacts with an email, ad, or postcard.

Create a targeted campaign
Don’t forget that you can click on almost any piece of information on the audience dashboard to instantly take action on it and create a campaign. Just choose the type of campaign you want to create in the pop-up modal and we’ll open the builder for the campaign you chose with the segment of your audience already selected.
You can target eligible contacts with an email, ad, or postcard. To view the contacts in the segment you chose, click View Contacts.
All the data you see on the audience dashboard is also available in our regular segmentation tool, so you can create your own, more complex segments that include the information surfaced here. For example, you could create a segment to target contacts who are in one of your top locations and who engage with your email campaigns often.
Learn how to create a segment or check out all the segmenting options available to you.
Switch audiences
As a best practice, we recommend you maintain only one audience in Mailchimp, and use tags and segments to organize and target your contacts. But if you have multiple audiences, you’ll still view most of your account, including the audience dashboard, in the context of one audience at a time.
If you want to switch between different audience dashboards, just click the Current audience drop-down and choose the one you want to work with. You’ll also see this drop-down on the Campaigns and Reports pages.

Whenever you switch to a different audience, it becomes the new default for your account.
Technical Support

Have a question?
Paid users can log in to access email and chat support.